“Hunter’s Pie”

Well, last week we got a stomach virus. So that was fun.

20161215_194725Anyway, Hubby got a deer this year, so we’ve been spending time processing and eating it. The roasts have been amazing, but I’ve been hesitant to make anything with the ground meat. I had this weird idea that ground venison wouldn’t taste so great so I kept putting it off.

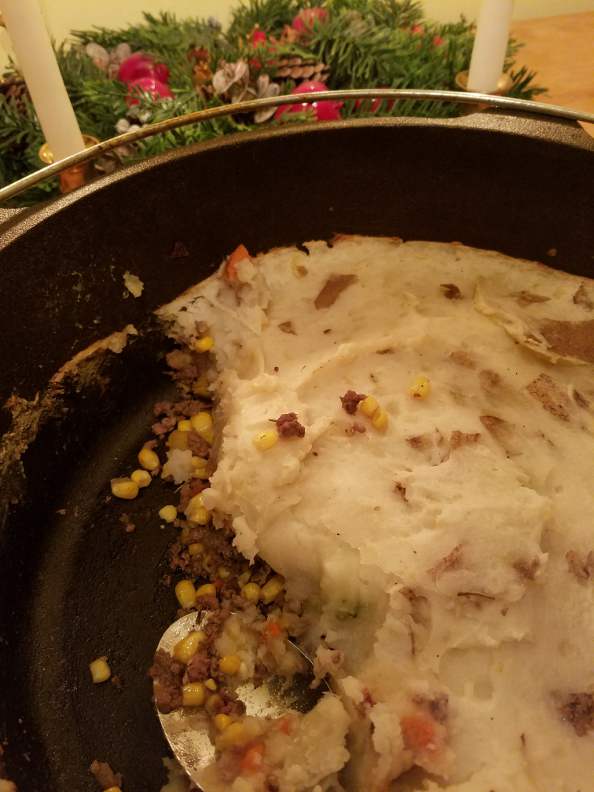
I did a little experiment to see if shepherd’s pie would translate well with ground venison. I made a few adjustments to the recipe and it turned out pretty delicious so I’m sharing it with you guys! I’m really glad it turned out well because we have a lot of ground venison, so it’s nice to know that this is one option that’s palatable. Hamling even had two helpings!

Hunter's Pie

  • Servings: 8-10
  • Difficulty: medium
  • Print
5-6 medium potatoes, cubed
3-4 Tbs butter (or other oil)
1/4 cup almond milk
1/4 cup broth
1 cup frozen corn
salt and pepper to taste

1 lb ground venison
4 slices of bacon
1 Tbs butter (or other oil)
1/2 medium onion, diced
4 carrots, diced
4 cloves of garlic, minced
2 tsp rosemary
1 tsp salt
1/2 tsp marjoram
1/2 tsp ground black pepper
1/2 cup broth

  1. Fry bacon in a 3 qt oven-friendly dutch oven until crispy.
  2. While the bacon is frying, start boiling the potatoes. Boil them for 20 minutes.
  3. Remove the bacon and place on a plate. Melt the butter in the bacon grease and add the diced veggies. Cook until the onions are translucent, about 10 minutes. Add the venison, spices and garlic and cook until the meat is fully brown.
  4. If using fresh green veggies, add them with the broth. Bring to a simmer, cover, and turn to low.
  5. Preheat oven to 420°F
  6. Simmer the meat and veggies for as long as it takes to preheat the oven.
  7. At this point the potatoes should be done. Drain the potatoes, return to the pan and add the remaining ingredients. Mash until smooth.
  8. Crumble the bacon and set aside.
  9. When the oven is preheated add frozen corn and bacon to the filling and spread the mashed potatoes over top. Place in the oven and bake for 20 minutes, or until the potatoes start to get golden. Let sit for 15 minutes and then serve.

Gluten Free Brownies.

I try to cut the sugar in half for everything sweet I bake. Not because I’m making a concerted effort to be healthy, but because I can’t handle (what seems like) the excessive amounts of sugar that things like cookies and cakes call for.

I went on an intense candida diet for a while where I cut all sugar, including fruit, for two weeks. After that I reintroduced fruit, but kept refined sugars out. Ever since then I have a much lower tolerance for sweet things which leads to awkward situations where I get served cornbread as an appetizer and it feels like I’m eating dessert before my dinner. I honestly wanted to save that cornbread and just have it after my meal with a bit of butter and honey, haha.

Anyway, I automatically cut the sugar in any given dessert recipe in half (excepting yeasted things because the yeast needs the sugar to actually work), which can create interesting results. In cookies it manifests as less spread, so you have to smoosh the dough before baking unless you enjoy oddly cake-like cookies. In brownies it manifests as a less fudge-y texture. So, if you’re a fan of cake brownies, no adjustments are needed.

I wanted to make brownies that were somewhere in between, so I tried various adjustments and I think I came up with something that is pretty awesome. I haven’t tried using liquid sweetener (like maple syrup) yet, but I’ll get back to you.20161112_112119

Gluten Free Fudge-y Brownines

  • Servings: 16 brownies
  • Difficulty: easy
  • Print
4 ounces (3/4 cup plus 2 Tbs) flour blend
1/2 tsp salt
1/2 tsp xanthan gum
7 ounces semisweet chocolate chips
4 Tbs butter
2 ounces cocoa butter
3 Tbs cocoa powder
4 1/2 ounces (1/2 plus 1/8 cup) sucanat
1 large egg
2 egg yolks
2 tsp vanilla

  1. Melt the butter, cocoa butter, chocolate chips and sucanat in a large pan over low heat. Stir in cocoa powder, remove from heat and stir in vanilla.
  2. While everything is melting line an 8 inch square cake pan with foil. You can oil this if you like, but it works without oil as well.
  3. Whisk dry ingredients together.
  4. Whisk the egg and egg yolks into the chocolate mixture and pour into the dry ingredients. Stir with a spatula until everything is combined. Cover with plastic wrap and let sit for 30 minutes.
  5. Move the oven rack to the middle position and preheat oven to 350°F.
  6. Bake for 45-55 minutes, rotating pan halfway.
  7. Let brownies cool completely in the pan on a wire rack before serving.

Notes

  • The cocoa butter is completely optional. If you’d rather not use it, just use 8 Tbs butter.
  • You can substitute coconut oil for the butter for a dairy-free brownie.
  • The longer you bake these, the more like cake they will be when they cool.
  • Save the egg whites! Stick them in a jar in your fridge and they’ll keep for an amazingly long amount of time. You can use them to make coconut macaroons, or angel food cake, or any number of things.

P.s. Every time I went to type brownies I would write brownines…I have no idea why.

Crock Pot Chicken Curry.

My crock pot is my best friend. If I know I’m going to have a busy evening I can start dinner that morning and not have to worry about cooking during what I affectionately refer to as “the witching hour.” Around the time I’m getting ready to start dinner, Hamlette is usually getting tired and a little cranky. I often end up backpacking her in the mei tai just so I can get food ready for a family dinner when Hubby gets home from work. If he’s not working, usually he can hold her while I cook, but if he’s home we eat at an earlier time.

20161028_141433Ah, the joys of shift work!

Anyway, crock pots. I can’t recommend them enough. There are loads of crock pot freezer meals that you can make ahead of time and then just dump the bag of goodies into the crock pot that morning for a lovely, no hassle, dinner. This isn’t one of those, but it’s still really easy.

As an added bonus: zucchini is super delicious in curry, so if you grow zucchini, or have a neighbor who is always trying to give you zucchini, this is a good way to use it up!

Chicken Curry

  • Servings: 8-10
  • Difficulty: easy
  • Print
1 pound chicken
1 1/2 cups chicken broth
1 zucchini, diced
4-6 cloves garlic
1/2 onion, chopped
2 Tbs dried basil
1 1/2 Tbs yellow curry powder
2 tsp salt
1 tsp fresh ginger, peeled and finely chopped
1 tsp chili powder
1 can full fat coconut milk
Fresh basil, chopped

  1. Combine everything but the coconut milk and the basil. Cover and cook on high for 3-4 hours or low for 6-8, until chicken is cooked through.
  2. 1 hour before serving add the coconut milk and shred the chicken.
  3. Serve over rice.


‘Tis the Season!

Autumn has begun and so has the pumpkin-ocalypse! Everything is slowly being consumed with pumpkin spice flavor, sometimes with amazing results and sometimes with head-scratching disgust.

So I thought I’d jump on the bandwagon! Heh.

20161023_132956I wanted to share a recipe with you guys for gluten free pumpkin breakfast muffins. They are really tasty! I found a recipe in a magazine for pumpkin cakes using regular flours and converted it to gluten free. These are perfect if you know you’re going to have a busy morning: you can make them the night before and take them with you to have breakfast on the go.

Don’t worry, t looks like it has a lot of ingredients, but that’s mostly because I broke up the pumpkin pie spice into separate measurements (because I don’t have the spice mix).

Pumpkin Muffins

  • Servings: 12
  • Difficulty: easy
  • Print
1 cup flour blend
1 cup gluten free oat flour
2 1/2 tsp baking powder
1 tsp cinnamon
1/2 tsp ground ginger
1/4 teaspoon nutmeg
1/4 teaspoon allspice
1/2 tsp salt
2 eggs
1/2 cup sucanat
1 cup almond milk
3/4 cup pumpkin puree
1/4 cup coconut oil, melted
2 tsp vanilla

  1. Preheat the oven to 325°F.
  2. Mix all the dry ingredients. Mix the wet ingredients in a separate bowl or measuring cup.
  3. Combine the dry and wet ingredients until smooth.
  4. Grease a muffin tin (or line with cupcake wrappers) and portion batter evenly between the cups. A cookie scoop works well for this.
  5. Bake for 30-35 minutes, rotating muffin tin halfway, until a toothpick comes out clean.
  6. Allow to cool in the muffin tin for 10 minutes on a wire rack before removing to cool completely.
  7. Store in an airtight container at room temperature for up to 3 days.

Dairy Free Skillet Cornbread.

20161016_182003I apologize for the quality of this picture: I was in a hurry when I was taking it. So, while I took three separate pictures, none of them turned out very well.

Anyway, it’s getting to be a bit colder here, which is excellent chili weather. The best thing to eat with chili is cornbread (of course) so I make a lot of it. The trouble is that most recipes call for sour cream and milk, so I decided to try using some alternative ingredients.

This is the (super delicious) result. The recipe is a little bit of work, but it’s totally worth it.

Skillet Cornbread

  • Servings: 12
  • Difficulty: intermediate
  • Print
11 1/4 ounces cornmeal (2 1/4 cups)
1 1/2 cups plain coconut milk yogurt
1/2 cup almond milk
1/4 cup avocado oil
1/4 cup coconut oil
1 teaspoon baking powder
1 teaspoon baking soda
3/4 teaspoon teaspoon salt
2 large eggs

  1. Adjust oven racks to lower-middle and middle positions and heat oven to 450°F. Place a 10 inch skillet (preferably cast-iron) on the middle rack and heat for 10 minutes.
  2. Spread cornmeal on a rimmed baking sheet and toast on the bottom rack until fragrant and lightly browned, about 5 minutes.
  3. Transfer toasted cornmeal to a large bowl and whisk in yogurt and milk. Set aside.
  4. When skillet is hot, add the avocado oil and heat for another 5 minutes.
  5. Using potholders, remove the skillet from the oven and add the coconut oil to the hot avocado oil, swirling gently to incorporate. Pour hot oil mixture into the cornmeal mixture and whisk until combined (resist the urge to scrape the extra oil out with a spatula). Whisk in baking powder, baking soda and salt. The batter will immediately start to rise. This is normal.
  6. Whisk in the eggs then pour the batter into the hot skillet and place on the middle rack with a clean cookie sheet underneath to catch any drips that may occur.
  7. Bake for 12-15 minutes, or until the top begins to brown and crack and the sides are golden brown, rotating skillet halfway.
  8. Allow the bread to cool for 5 minutes in the skillet before flipping it out onto a cooling rack.
  9. Cool for 10 minutes and then serve.

Notes

  • This works best with yogurt that’s past it’s date, which basically means it is more sour than fresh yogurt. I usually keep an eye on the dairy discount section of the stores I frequent and make this whenever I pick up a tub of coconut milk yogurt that’s about to “go bad.”

Sweet Potato Pudding.

Well, here we are again. It’s Saturday. Oops.

Last night our little chicken died, we’re not sure what was wrong with her. She has always looked a little sickly, but I thought she had been looking better recently until she spent all day in the coop yesterday. Hubby opened the coop this morning and took care of her body. It’s a little sad, but life goes on.

On that note, today I’m sharing a recipe for a vegan pudding.

20161006_125006I love sweet potatoes and recently I’ve been buying them in bags (rather than loose) because Hamlette is really liking solid foods – she has 6 teeth already! I follow a paleo page on Facebook and they shared a recipe for sweet potato chocolate pudding I’d been wanting to try, but I couldn’t find it so I picked the first one I googled. I made that recipe but I didn’t like the texture at all so I tried mixing in some coconut milk. The coconut milk did the trick: the grainy mousse turned into a nice, smooth pudding.

Sweet Potato Chocolate Pudding

  • Servings: 4
  • Difficulty: easy
  • Print
2-3 medium sweet potatoes
1/4 cup cocoa powder
2 Tbs coconut oil
1 Tbs sweetener of choice
1 tsp vanilla
1/4-3/4 cup full fat coconut milk

  1. Bake the sweet potatoes for an hour at 350°F. Cool and peel the sweet potatoes.
  2. Blend everything but the coconut milk until smooth. At this point it will look a lot like a mousse.
  3. Scrape the chocolate mixture into a bowl and stir in the coconut milk until you reach a good consistency.
  4. Serve.

Notes

  • If making ahead, bring the pudding back to room temperature before eating: it firms up in the fridge and becomes less pudding-y
  • You could use melted cocoa butter instead of coconut oil for a richer flavor.

Millions of Peaches…

Millions of peaches, peaches for me
Millions of peaches, peaches for free

Look out!
-The Presidents of the United States of America

My parents brought a huge box of Palisade peaches with them when they visited for Hamling’s birthday. Last year I just split a box because I didn’t think we could go through a full box ourselves. Well, I was surprised when I went to finally make a cobbler and there were only 3 peaches left: we had eaten them all! So this year I decided to get a full box and freeze some for later use.

20160830_135930There are several ways to freeze peaches. You can freeze them in water, juice, syrup or dry. I opted for dry packing because I wanted to be able to use them in smoothies (if I ever actually made a smoothie). I packed them in two different ways: I put the peach slices straight into the bag and froze them, and I put the slices on a sheet, froze them and then placed them in a bag. Either way works, but I like the second method because the peaches stay fairly separated in the bag so you can take out two or three slices if that’s all you want.

Here’s how to freeze peaches using the dry pack method:

  1. Juice a lemon into 1 cup of water.
  2. Slice peaches, dropping the slices into the lemon water.
  3. Remove the peach slices from the lemon water and place in a small freezer bag (for portioning convenience) or onto a tray that will fit into your freezer.
  4. If using the tray, freeze until the slices are completely frozen -about 2 hours- then remove from the freezer, run some hot water over the bottom of the dish the slices were on to loosen them and scrape them off. Put the frozen slices into a small freezer bag.
  5. To remove the air from the bags follow the directions in the video below.

I didn’t peel my peaches because I’m lazy, and I don’t mind peach skin. If you’d rather peel them, just add a step before slicing.

Happy freezing!

Gluten Free Peach Cobbler.

20160911_201718It’s peach season (sort of, it’s kind of the end of the season now) so we’ve got a lot of peaches. That means a lot of peach cobbler (and lots of frozen peaches). I’ve been experimenting with different recipes to get the perfect peach cobbler and I think I’ve done it. It’s perfectly bread-y, and just the right amount of sweet. This is one of those recipes that, if you didn’t say anything, no one would know it was gluten free. It’s also easy to make this vegan and, though I can’t personally vouch for this, I bet it’s equally delicious because coconut oil is amazing.

The first cobbler I made didn’t have enough cobbler base. It called for a 3 qt (I think) dish, so I looked on the bottom of my 9×13 pyrex and confirmed it was the proper size. I think what the recipe actually wanted me to use was something smaller with a higher lip. Anyway, what I ended up with was a cobbler that was good. It was reminiscent of the “graham” crackers I make sometimes in flavor, but it was just too thin.

20160911_201612The second cobbler was all oat flour and it was the perfect thickness in the 9×13 pan, but it called for a whopping 4 teaspoons of baking powder. When I was mixing everything together I thought, wow that is A LOT of baking powder! But gluten free cooking can be weird sometimes so i figured I’d just follow the recipe and see how it turned out. Well, it definitely had too much baking powder. You could taste the baking powder. Not good.

So the third (and fourth) cobbler(s) I made were a mix of the two recipes. This recipe is a winner. I took two photos of it, but I couldn’t pick which I liked best so I included both of them because I think they both show the texture of the cobbler accurately.

Gluten Free Peach Cobbler

  • Servings: 10
  • Difficulty: easy
  • Print
1 stick of unsalted butter (1/2 cup)
3/4 cup sucanat
1 cup flour blend
1 cup oat flour
2 teaspoon baking powder
1 teaspoon salt
1 cup milk (any kind, I used almond milk)
6 cups peaches

  1. Preheat the oven to 375°.
  2. Slice the peaches into a bowl. Peeling is optional.
  3. Mix batter together and pour into a greased 9×13 baking dish and spread to the edges using a spatula. The batter will start rising right after it’s mixed, this is normal, don’t worry!
  4. Pour in peaches, making sure they cover the entire surface of the batter and bake for 35-40 minutes until the cobbler is light brown.
  5. Allow to cool slightly before serving.
  6. Serve with heavy cream, ice cream, dairy free ice cream, or dairy free milk.

Salad Anatomy 101.

20160831_195731 I know it’s sort of late in the season to be writing about salads, but we’ve been eating a ton of them lately in an effort to be budget friendly. So I thought I’d share some tips for making a salad worth being a main course.

Mix greens.
I buy a head each of organic red leaf lettuce, green leaf lettuce, and romaine. I take them home, rinse them off, chop them up, and mix them well in a large bowl. This usually lasts me for a week and a half or more, depending on hubby’s work schedule. But, how do you keep your lettuce from browning? you ask. Storing chopped lettuce in a mason jar with a standard canning lid set (not a plastic lid) and a paper towel on the bottom really works. The lettuce will stay fresh for as long as 2 weeks.

I don’t recommend adding spinach greens to your salad raw because of their high oxalate content which prevents absorption of calcium. Beet greens are a bit problematic as well. If you have a yard that you don’t treat with chemicals, you can grab some dandelion greens for your salad. I wouldn’t recommend buying them: they cost almost $3 for a small bunch where I am, and that seems like a ridiculous price to pay for something that grows everywhere. Just be sure to pick leaves from plants that haven’t bolted yet (started growing a flower) so you’re greens aren’t overly bitter.

20160903_124044Multiple sources of protein.
I try to have meat of some form on my salads if I’m making one for dinner. I’ll put less meat or no meat at all on lunchtime salads because I usually want a lighter meal for lunch.
Other than meat I like to add different kinds of sprouted beans. You can use whatever kind of beans you like; they don’t necessarily need to be sprouted. I sprout mine for better nutrient absorption, and I like the way they taste, but it’s totally optional. A bonus with using cooked and cooled beans is that you get some resistant starch with your salad, which helps your digestion.
Soaked and dried nuts are also a great addition to salads because they add a delightful crunch.

Something raw other than the greens.
Think sliced tomatoes, shredded carrots, avocados, etc. If you’re struggling with thyroid issues, avoid eating raw cruciferous veggies.

Fermented veggies or pickled veggies.
I like to top my salads with some purple cabbage cortido, because it’s delicious (even though I hate sauerkraut) and crunchy. It also adds a delightful tang to your salad. If I don’t have any on hand I like to chop up some pickles, pickled okra is good as well, or artichoke hearts. Olives are also delicious.

Sprouted seeds.
I love putting sprouted and dried sunflower seeds on top of my salad. This is something I picked up from my awesome mother-in-law. She makes incredible salads.

Dressing.
I find that sometimes I don’t even need dressing if I’ve put enough stuff on the salad, but my go-to dressing recipe is below (this is a good dressing if you’re fighting a candida overgrowth):

Lemon Salad Dressing

  • Servings: 2 cups
  • Difficulty: easy
  • Print
1/2 cup fresh squeezed lemon juice
1/2 cup filtered water
1 cup olive oil
1 tsp ground mustard
1/2 tsp salt
1/2 tsp ground black pepper

  1. Combine all ingredients in a jar. Shake well. Serve.

Really, the possibilities are endless. These are just some suggestions based on things that I have found to take a salad from good to great.

What do you usually put on your salads?

Fondant (that isn’t death by sugar).

20160827_135127When I asked Hamling what kind of party he wanted for his birthday this year he said he wanted an airplane party. While we were scrolling through the internet trying to pick out a cake he’d like to have he saw one that was made with fondant. I’ve never made fondant before, and I had only heard people say it was gross. Not only that, but any kind of frosting that takes as much powdered sugar as fondant gives me an unpleasant tickling feeling at the back of my throat just thinking about it. I wanted to make a fondant that was not as sweet, but still functioned fairly well. Impossible, right?

Challenge accepted.

I ended up with something that was still pretty sweet, but I was afraid to use any more starch than I already had. As far as frosting goes, this was pretty good, and it was very workable. Maybe I’ll practice my fondant smoothing skills next time I make it.

Fondant

  • Servings: 1 cake
  • Difficulty: medium
  • Print
1 teaspoon unflavored gelatin (agar agar if making a vegan cake)
1/8 cup cold water
1/4 cup organic corn syrup
1 Tablespoon shortening or butter
1 1/2 cups tapioca starch
2 1/2 cups powdered sugar
1 teaspoon vanilla

  1. Combine gelatin and water and let sit until thick. Place it on a double boiler to melt.
  2. Add the syrup and mix well. Add shortening or butter and mix until just melted. Remove from heat and add vanilla. Cool mixture until lukewarm.
  3. Put 1 cup of starch and 1 cup of powdered sugar into a bowl. Make a well in the center and pour the liquid gelatin mixture into the well. Stir with a wooden spoon until combined. Add the remaining starch and stir.
  4. Generously dust a flat surface with powdered sugar and pour out the sticky mess in your bowl onto the sugar. Knead in the remaining powdered sugar 1/2 cup at a time until the fondant no longer sticks to your fingers.
  5. Roll out between two sheets of plastic wrap, brushing the top of the fondant with oil to prevent sticking.
  6. Apply to cake.

Notes:

  • If you want colored fondant and you’re using liquid coloring, add the color of your choice to the liquid before you mix it into the starch/sugar.
  • If your cake is going to be sitting out for a little bit, brush the entire surface with oil to keep the fondant from drying out and cracking.
  • This will store for up to a month in the fridge. If you find it’s dry when you take it out to use it, knead in some more oil.