Super Awesome Secret #2!

Instant Oatmeal is expensive. Luckily it’s also amazingly easy to make at home from regular oats. You can use quick cooking oats if you’d like, but I just use regular rolled oats, sometimes extra thick rolled oats. Basically I use whatever I have on hand.

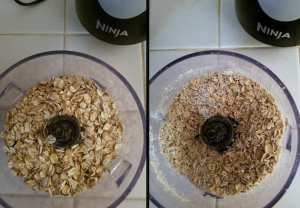
Put the amount of oats you want to make into a blender or food processor and pulse until your oats look like the instant oats you get in the store. It takes my Ninja 10 pulses to get the right texture.oatsI don’t make these often because I prefer to ferment my oats before I make oatmeal for better nutrient availability, but this is great for those times you just need a quick snack.

You can portion them out into bags and add sucanat, salt, dried fruit, whatever you fancy. Bonus savings if you have a food dehydrator and can dehydrate your own strawberries or apples. You could even sprinkle cinnamon on the apples before you dehydrate them to make an apple cinnamon oatmeal.

Salad Anatomy 101.

20160831_195731 I know it’s sort of late in the season to be writing about salads, but we’ve been eating a ton of them lately in an effort to be budget friendly. So I thought I’d share some tips for making a salad worth being a main course.

Mix greens.
I buy a head each of organic red leaf lettuce, green leaf lettuce, and romaine. I take them home, rinse them off, chop them up, and mix them well in a large bowl. This usually lasts me for a week and a half or more, depending on hubby’s work schedule. But, how do you keep your lettuce from browning? you ask. Storing chopped lettuce in a mason jar with a standard canning lid set (not a plastic lid) and a paper towel on the bottom really works. The lettuce will stay fresh for as long as 2 weeks.

I don’t recommend adding spinach greens to your salad raw because of their high oxalate content which prevents absorption of calcium. Beet greens are a bit problematic as well. If you have a yard that you don’t treat with chemicals, you can grab some dandelion greens for your salad. I wouldn’t recommend buying them: they cost almost $3 for a small bunch where I am, and that seems like a ridiculous price to pay for something that grows everywhere. Just be sure to pick leaves from plants that haven’t bolted yet (started growing a flower) so you’re greens aren’t overly bitter.

20160903_124044Multiple sources of protein.
I try to have meat of some form on my salads if I’m making one for dinner. I’ll put less meat or no meat at all on lunchtime salads because I usually want a lighter meal for lunch.
Other than meat I like to add different kinds of sprouted beans. You can use whatever kind of beans you like; they don’t necessarily need to be sprouted. I sprout mine for better nutrient absorption, and I like the way they taste, but it’s totally optional. A bonus with using cooked and cooled beans is that you get some resistant starch with your salad, which helps your digestion.
Soaked and dried nuts are also a great addition to salads because they add a delightful crunch.

Something raw other than the greens.
Think sliced tomatoes, shredded carrots, avocados, etc. If you’re struggling with thyroid issues, avoid eating raw cruciferous veggies.

Fermented veggies or pickled veggies.
I like to top my salads with some purple cabbage cortido, because it’s delicious (even though I hate sauerkraut) and crunchy. It also adds a delightful tang to your salad. If I don’t have any on hand I like to chop up some pickles, pickled okra is good as well, or artichoke hearts. Olives are also delicious.

Sprouted seeds.
I love putting sprouted and dried sunflower seeds on top of my salad. This is something I picked up from my awesome mother-in-law. She makes incredible salads.

Dressing.
I find that sometimes I don’t even need dressing if I’ve put enough stuff on the salad, but my go-to dressing recipe is below (this is a good dressing if you’re fighting a candida overgrowth):

Lemon Salad Dressing

  • Servings: 2 cups
  • Difficulty: easy
  • Print
1/2 cup fresh squeezed lemon juice
1/2 cup filtered water
1 cup olive oil
1 tsp ground mustard
1/2 tsp salt
1/2 tsp ground black pepper

  1. Combine all ingredients in a jar. Shake well. Serve.

Really, the possibilities are endless. These are just some suggestions based on things that I have found to take a salad from good to great.

What do you usually put on your salads?

Lilla Rose Giveaway!

I’ve been trying for a really long time to grow my hair out. I could never get it to grow longer than my shoulder blades, no matter how long I went before cutting it. Eventually I resigned myself to that length of hair and went on with my life.

Well, now my hair is down to the middle of my back! I don’t know if it’s because of my diet change, or maybe I’ve just always had latent thyroid issues and when I resolved them my hair started to grow longer. Maybe it was being pregnant a second time. Whatever the reason, I am pretty stoked!

Except I’m realizing that I have no idea how to style longer hair, or take care of really long curly hair. It’s definitely an adventure. Part of my problem is that I’m lazy: the reason I don’t wear makeup every day is it’s too much effort. I’d rather not spend a bunch of time every day in front of a mirror, so styles that require tons of bobby pins or a curling iron are a no-go.

Cue Lilla Rose.

I had heard of Lilla Rose from a good friend of mine when she hosted a party with Katrina. I didn’t pay attention then, because I didn’t think I needed any new hair stuff. It turns out I was wrong, but I wouldn’t figure that out for another two years (I think, I’m bad at keeping track of time) when the bee flexi popped up in my Facebook news feed:

I fell in love with it (because, dangly things!) so I ordered one from Katrina. Now I’m wondering why it took me so long! The style in the picture took me less than 5 minutes and it held all day long. These clips are really pretty and super comfortable, which is a plus because now that my hair is longer my bun claw isn’t so nice to my head.

I got really excited and when I get really excited about things that make my life easier I want to share them with everyone (hence this blog). So, to share this awesome thing with you Katrina has made a giveaway! This giveaway is only open to ladies who haven’t worked with another stylist before (we don’t want to poach anyone’s clients!) and it’s sponsored by the awesome Independent Stylist Katrina Burbank! As an added bonus, there is a sale happening until Saturday night on select Lilla Rose hair candies so you can save some money while you get your goodies!

a Rafflecopter giveaway

Why did the Chicken Cross the Road?

Lately I’ve had money on my mind, specifically our grocery budget. It seems like I’m spending a lot more than usual while buying the same amount of food. I haven’t changed the items I’m buying (no different brands or anything) and it doesn’t seem like we have more food than usual every week. I can’t figure out what’s going on. It could be a general increase in the price of food that I haven’t noticed, but I’m not sure that that would account for the amount my spending has increased.

Anyway, I’ve spent a lot of time thinking of ways to stretch our meat, specifically chicken as it’s the cheapest meat I buy. I’ve got it so that one chicken gives us 3 meals minimum in addition to broth.

I used to roast whole chickens and then use the leftover meat for salads or stir fries. That’s much less economical than butchering the chicken and using the parts separately. This is how I do it:

I cut the breasts out and use them for a crock pot meal like Santa Fe Chicken. This gives me three meals out of just the breasts in comparison to one if I just bake them and serve with veggies. I can then cut the thighs off with the drumsticks and make Filipino Chicken (which I will share a recipe for soon) for two meals, or make a different crock pot meal. This week I’m trying out a new recipe for chicken curry I found in a magazine. That should give me at least two more meals. You can then roast what’s left for crispy wings which make a good lunch served with a salad or rice or what-have-you.

That’s a total of 6 meals from one chicken, 7 if you get one with giblets because you can make a liver and onions dish for lunch (if you can stomach it). That doesn’t even include all of the meals you can make with the broth from the bones.

So that’s my chicken routine. I had to get really comfortable with cutting raw chicken. I used to hate it, but I made myself be okay with it on account of the money I was saving. My city-girl discomfort is not worth breaking the grocery budget.

Here is a helpful video:

How do you stretch your groceries?

Book Review: Fasting as a Family by Melissa Naasko.

Melissa Naasko is a friend of mine, so reading this book was a little like sitting and listening to her talk about food. She moved away a few years ago, so it was nice to read this and “hear” her voice for a bit. She is a wonderful woman and I miss hearing her stories.

That said, this book is geared toward Orthodox Christian households. I am not Orthodox Christian, so I don’t fast quite as hardcore as the intended audience, but I did need some dairy free ideas for Friday fasting aside from pan-fried fish with rice and veggies. This book delivered and then some. Even if you’re not Orthodox Christian this is a helpful book. She includes worksheets and helpful budgeting advice in addition to some pre-made menus.

I’ve made three recipes from this book and I have not been disappointed so far! It’s really helpful to have a book dedicated to meatless meals to turn to when I’m out of ideas (which happens a lot). Whether I need to cut back on meat for budget reasons or fasting, there are some really good ideas in here and I’m excited to try more of the recipes soon.

Would I recommend this? Yes. So much yes. I would happily pay the $21.95 again.

Sew Your Own Pocket Diaper Inserts.

I love cloth diapers. I’m even more fond of pocket diapers. It’s a personal preference, to be sure, but I like pocket diapers better because they have customizable absorbancy and they wick moister more than prefolds. This means that I don’t absolutely have to change the baby every time he or she pees, and you can hack your way to a diaper that lasts for 12 hours with the right inserts for overnight use.

The thing about ordering pocket diapers is that they come with microfiber inserts, or you can pay extra (at least all of the ones I have purchased). For someone who is budget-minded the extra fee is a deal-breaker, but the microfiber inserts aren’t very good.

I have had two heavy wetters. Hamlette is a heavier wetter than Hamling was, so I need something that absorbs a lot of liquid rather quickly. When you put a microfiber insert under the faucet the water beads and rolls off. This means that the diaper is more likely to leak if you use these inserts. Even paired with a hemp insert I was having a lot of trouble with leakage because the hemp absorbs slowly and the pee had nowhere to go but out as the microfiber failed.

To fix this I did some research about fabrics that absorb quickly and, preferably, a large quantity of liquid. I decided that a bamboo/cotton blend would be best, so I purchased a yard or two (I can’t remember) of a bamboo/cotton micro-terry from an online natural fabric store. If you’re not sure what micro-terry is, just think of those baby footie pajamas that are made out of material that’s like a super soft towel. That’s micro-terry.

If I remember right, it was somewhat less economical as I was hoping, but I think I cut the insert cost in half by making my own.

This time around (because I didn’t make enough micro-terry inserts) I didn’t want to buy the fabric and have to strip it and all that jazz. So I raided my ridiculously large stash of prefolds. When I was buying prefolds I didn’t know what to look for (or what I liked) yet, so I got some that were too wide. My mom ordered me a few that were thinner and I ended up primarily using those and using the wider ones as a sort of last resort.

So I cannibalized them.

These inserts do not hold as much liquid as the bamboo ones, but they absorb fast enough that they last through two to three pees. That’s pretty good. As long as I’m not picking up a wet baby I’m happy.

inserts

So, to make these you’ll need a sewing machine, thread, scissors, a marking device, a stencil, and fabric of your choice. If you’re starting with a yard of fabric, you’ll need to decide what thickness you want – I made the bamboo inserts with four layers of fabric – and you’ll need pins to keep everything in place. You’ll also want to wash the fabric a few times in super hot water before you start.

I used an existing insert with a slight modification to the length for my stencil.

Trace your stencil onto the fabric. Sew according to the lines you drew, keeping the edge of the sewing machine foot on the line. Repeat until all of the inserts are sewn, like the picture on the upper right. Trim threads and cut out inserts on the line you drew. Voila!

The bottom picture is a newly cut insert (left) and one that’s been through the wash a couple of times (right). The washed one isn’t exactly pretty, but they’re inside of a pocket diaper, who cares what they look like? The bamboo inserts did not fray at all, so your finished appearance depends on the fabric you chose. Also, you could put more effort into it and actually finish the edges. I didn’t do that because I am teh lazy-sauce.
Chickens!

We got chickens a few weeks ago from someone who was giving them away. We were supposed to take their coop as well, but it was decided that the coop was too difficult to move. I guess it would have had to have been completely torn down to move (it was a refurbished playhouse). So, we spent the Sunday we got them building a little coop in Grampop’s garage. By “we” I mean Hubby and Grampop. It took them about 5 hours to finish.

The coop looks small, but it serves as a hotel for our two chickens (who have been named Neville and Eville). All they do is sleep and lay eggs in there, the rest of the time is spent outside looking for bugs.

We let them free-range our yard unless no one is going to be home, and they seem to be pretty happy. So long as the dog isn’t chasing them, ha.

Chickens are not hard to care for. I thought they were going to be difficult, but they really aren’t any more difficult than a dog or a cat. You open up the coop in the morning, scoop out the poop and any soiled pine shavings, feed and water them. It gets more complicated if they spend their whole day inside of a large coop because there is more cleaning involved, but the system we’ve got is pretty nice.

We started out with an egg eating problem, however. That is a special kind of disappointing: go to reach for a freshly laid egg and the hen turns around and pecks it open! The little chicken ate two eggs total, but has stopped now. I blew out two eggs and filled them with mustard and we put a golf ball inside the coop for her to bruise her beak on. I’m not sure if either of those things were what made her stop, but she hasn’t eaten any more since the second egg.
Who knew chickens ate their own eggs? Apparently it’s a common problem, although it still doesn’t make any sense to me on a basic survival level.

The dog ate one of our eggs, so we lost a total of three to the animals. Now we know to keep the eggs where the dog can’t get them when we bring them inside. I wasn’t expecting it because I have fed our princess dog raw egg before and she wouldn’t touch the shells. It didn’t occur to me that a fresh egg smells different because it hasn’t been washed.

Now it’s time for math!

The feed we buy is $27 for 50# (organic, soy free mash).
Poultry grit is $10 for 5#. You have to mix 1# into 40# of feed or free feed. I’m going with the former method in the interests of making math easier.
Pine shavings are $13 for a huge bag. I haven’t gone through a third of it yet and it’s been 3 weeks.

So feed is $.57 per pound making 40# cost $21.6. Feeding expense per pound including grit runs at about $23.6 (or $.59 per pound). Each chicken eats 1/4 to 1/3 pound a day. Again, in the interest of easier math I’m going with the former number. We have two birds, so that’s 1/2 pound per day, 3.5 pounds per week. Weekly feed costs are $2.07 (rounding up). Assuming we use about 1/3 bag of shavings every 6 weeks we can add  $.72 a week making the total cost $2.79 per week.

We get a dozen eggs a week (each hen takes a day off of laying). A comparable carton of eggs from the store runs $4.99 and up. That saves us $2.2 per dozen, so about $9 a month.

It doesn’t seem like that much  on paper, but it’s more than worth it. We’re getting nutritionally superior eggs for $.20 less than what I normally pay for eggs from the store.

Not only that, but chickens are good workers! They till your soil, fertilize your garden (or grass) and keep pests in check.

I’m looking into ways of growing your own chicken feed to cut costs even more, so I’ll keep you updated!

Super Awesome Secret #1!

IMG_0869

You should know something: nut butters are amazingly easy to make.

All you need is a food processor and some nuts. You can get fancy by adding sweeteners or different kinds of oil, but most nuts turn into nut butter of their own accord when they’ve been ground finely enough. This goes for coconut as well.

I don’t know if you’ve ever seen the jars of coconut butter, or coconut cream you can buy in the store, but they’re pretty pricey most of the time. It’s much more economical to buy unsweetened shredded coconut and process it yourself. One pound will get you about a pint of coconut butter.

Here’s what you do:
Pour the shredded coconut into a food processor. Process until smooth.

IMG_0865

You’re welcome.

The Cost of Gluten Free Flour.

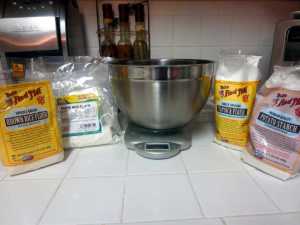
IMG_0719Over the last couple months I’ve been collecting data at the various stores I visit. It has taken me this long because I don’t regularly go to King Soopers/City Market and I try to make it a practice to avoid Whole Foods (aka Whole Paycheck). I took down prices for everything I use in my gluten free flour blend for comparison. I had made mental notes of prices before, but sometimes my memory is not the greatest, so the general idea I had that Natural Grocers was the cheapest place to buy my flour was a bit questionable.

It turns out I was right. By almost a dollar per pound compared to Whole Paycheck.

So get ready for some math!

First, you need white and brown rice flours, potato starch and tapioca starch. It turns out that Sprouts does not carry tapioca starch (at least I didn’t find it at my usual store) but King Soopers does. King Soopers, however, does not carry potato starch. The prices for the other items were the same at both grocers, so I’m going to assume that to be the case if other stores carry the missing starches and just call Sprouts/King Soopers one store for the purpose of this post. We’ll call it King Sprouts.

Sprouts does sell brown rice flour for $3.29 rather than $3.49 at King Soopers, but white rice flour is the same as King Soopers (at $3.49). When I was breaking the cost down per ounce I rounded up, so the cost per ounce ended up being $0.14 for both stores. Just keep in mind that brown rice flour is slightly cheaper at Sprouts.

Natural Grocers is my store of choice for most packaged goods. Their produce is amazingly pricey, but sometimes they have good sales. At any rate, Natural Grocers is the winner for flour because of their bulk section, but even if you can’t find white rice flour in their bulk flours (they discontinued brown rice flour, grr) they carry the Bob’s Red Mill at a lower price than the other three stores. Bob’s Red Mill white rice flour is $2.95 making it $0.12 per ounce. Brown rice flour is $3.15 making it $0.13 per ounce. Potato and tapioca starch are $3.69 and $3.45 making them $0.15 and $0.14 per ounce respectively. If you buy Bob’s Red Mill for everything the blend works out to be $2.08 per pound. Natural Grocers bulk white rice flour costs $2.65 for 32 ounces, making it $0.08 an ounce. That cuts the total flour blend cost down to $1.76 a pound!

For the purpose of this post, King Sprouts sells brown and white rice flours for $3.49 per 24 ounce package, making it $0.14 per ounce. Potato starch runs at $4.29 and tapioca starch at $3.79 making it $0.17 and $0.16 per ounce respectively. You need 24 ounces of white rice flour, 7.5 ounces of brown rice flour, 7 ounces of potato starch, and 3 ounces of tapioca starch to create the blend. This means King Sprouts comes out to $2.40 a pound for this particular flour blend. Not bad, but not the cheapest either.

Whole Paycheck (predictably) loses. I’ll spare you the cost breakdown, but the per pound cost works out to be $2.56. So, if you don’t have a Natural Grocers in your area, stick with Sprouts or King Soopers.

I didn’t check the prices for regular flours, so I’m not sure how this flour blend compares per pound to an unbleached white flour, or a whole wheat flour. But I’d say that $1.76 a pound is pretty affordable and it was really interesting to find the price differences from store to store. Maybe in a little while I’ll take down the prices for all of the pre-made flour blends and some regular flours for comparison. It’ll be a little pet project.