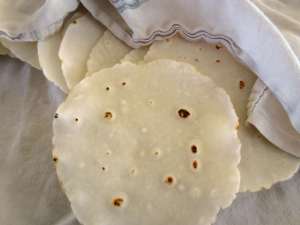
GF Flour Tortillas.

IMG_0853Hubby loves Mexican food. When we were planning our wedding he wanted to have a burrito bar for food. I was worried about getting sauce on my dress, so we opted to do a burrito bar for the rehearsal dinner. My super awesome friend made the burrito bar amazing, and my sister-in-law might have as well. Things are kind of fuzzy that far back. I do remember that they both made the wedding food amazing, but I can’t remember the rehearsal dinner.

Anyway, I make tortillas. A lot. I do corn mostly, because they’re easier and they’re naturally gluten free, but I had wondered for a while if I could make flour tortillas. As with anything gluten free, it has its challenges. Here are some tips for gluten free flour tortilla making:

Use a cast iron skillet (or comal). I was using a T-fal griddle pan for a while, but the cast iron does much, much better.

Do grease the skillet. If you have a seasoned skillet it’s not as important, but it helps a lot. I recommend lard for this. Only use enough to get a thin layer and re-coat every 2 or 3 tortillas. If you’re vegan, palm shortening would be a good substitute.

Use lard. I have used palm shortening before and, while it works, it just isn’t as good. If you’re vegan, palm shortening is a great option. If not, invest in some lard, you won’t regret it.

Warm water. Most flour tortilla recipes call for cold water. While cold water works, it adds more prep time because you have to cut the fat in really well before you add the water. Using warm water melts the fat a little, helping it distribute evenly through the dough which makes the cooked tortilla better.

Medium heat, short cook time. If you want flexible tortillas don’t cook them for longer than 1 minute and 30 seconds. If you overcook them, they’ll break when bent.

Do not skip the xanthan gum. Seriously. Do. Not. I was out once and I thought I’d just sub in some almond flour for the rice flour because almond flour is good for texture in gluten free stuff like pizza crust. Wrong. My tortillas just broke apart. The xanthan gum is for texture and structure, it is not optional.

Use a tortilla press. Press your dough first and then roll it out with a rolling pin. This way you get a more even looking tortilla.

Cover the cooked tortillas. They will dry out quickly otherwise.

Flour Tortillas (GF)

  • Servings: 4 (2 tortillas per person)
  • Difficulty: medium
  • Print
1 cup white rice flour
1/2 cup brown rice flour
Generous 1/2 cup tapioca starch
1 teaspoon xanthan gum
1/2 teaspoon baking powder
1/2 teaspoon salt
2 tablespoons lard
3/4 cup warm water

  1. Combine dry ingredients. Add lard and work into the flour a little. Add in the warm water and stir with a wooden spoon.
  2. Once the dough begins to come together a little start squeezing it together with your hands. Do this until the dough feels like play-doh and mostly holds together. It’s ok if a chunk falls off every now and then, the important part is that it holds it’s shape when squeezed. This should take about 5 minutes.
  3. Cover with plastic wrap and let it rest for 20 minutes.
  4. Preheat the skillet.
  5. Pinch off about 2 tablespoons of dough, roll into a ball and squish in a tortilla press between two pieces of plastic wrap. Move it to the counter and roll it thin while it’s still in the plastic wrap.
  6. Grease the skillet.
  7. Peel the top piece of plastic wrap off and lay it back on the tortilla press for the next tortilla. Flip the rolled dough onto your hand and gently peel the second piece off, draping on the top part of the tortilla press to be used for the next tortilla.
  8. Cook the tortilla for 1 minute, flip and cook for 30 seconds more. Remove and place on a plate, covering it with a towel.
  9. Repeat until finished.
  10. Enjoy.

Why did the Chicken Cross the Road?

Lately I’ve had money on my mind, specifically our grocery budget. It seems like I’m spending a lot more than usual while buying the same amount of food. I haven’t changed the items I’m buying (no different brands or anything) and it doesn’t seem like we have more food than usual every week. I can’t figure out what’s going on. It could be a general increase in the price of food that I haven’t noticed, but I’m not sure that that would account for the amount my spending has increased.

Anyway, I’ve spent a lot of time thinking of ways to stretch our meat, specifically chicken as it’s the cheapest meat I buy. I’ve got it so that one chicken gives us 3 meals minimum in addition to broth.

I used to roast whole chickens and then use the leftover meat for salads or stir fries. That’s much less economical than butchering the chicken and using the parts separately. This is how I do it:

I cut the breasts out and use them for a crock pot meal like Santa Fe Chicken. This gives me three meals out of just the breasts in comparison to one if I just bake them and serve with veggies. I can then cut the thighs off with the drumsticks and make Filipino Chicken (which I will share a recipe for soon) for two meals, or make a different crock pot meal. This week I’m trying out a new recipe for chicken curry I found in a magazine. That should give me at least two more meals. You can then roast what’s left for crispy wings which make a good lunch served with a salad or rice or what-have-you.

That’s a total of 6 meals from one chicken, 7 if you get one with giblets because you can make a liver and onions dish for lunch (if you can stomach it). That doesn’t even include all of the meals you can make with the broth from the bones.

So that’s my chicken routine. I had to get really comfortable with cutting raw chicken. I used to hate it, but I made myself be okay with it on account of the money I was saving. My city-girl discomfort is not worth breaking the grocery budget.

Here is a helpful video:

How do you stretch your groceries?

Day Late and a Dollar Short.

The last two days have been packed with things and I didn’t realize I hadn’t written until my head hit the pillow last night. If it had been earlier than 11 I might have gotten back up to post, but I figured I’d just write in the morning instead.

One day I’ll get organized. Maybe.

Anyway, I wanted to share my favorite crock pot meal. I found the original recipe on a website called “skinny” something, or at least it had some iteration of “low fat” in the name. I’m not a fan of low fat stuff, but the recipe seemed decent. So I changed it around a bit and came up with something super delicious (with plenty of good fat).

IMG_0959

I need a new camera…

This makes enough for our family of 3.5 (one of us isn’t eating food yet) to eat at least 4 meals. I haven’t tried freezing it yet because it’s so good I actually look forward to eating it for lunch or a second dinner.

Tip to make this even easier:
If you’re cooking something that calls for a partial onion, dice the remaining onion and store in a tupperware in your fridge while you’re cooking. This way you can just dump the onion into the pot when you’re ready to start the crock pot.

Santa Fe Chicken

  • Servings: 8-12
  • Difficulty: easy
  • Print
2 chicken breasts
1 medium onion, diced
4-5 cloves garlic, minced
1 bell pepper (any color), diced
28 oz diced tomatoes
16 oz black beans (drained)
4 oz diced green chilies
1.5 cups bone broth
1 cup frozen corn
1 teaspoon salt
1/2 teaspoon pepper
1 teaspoon chili powder
1.5 teaspoons cumin
dash cayenne
1/4 cup fresh cilantro, chopped (for garnish)
1-2 avocadoes

  1. Combine everything but the cilantro and avocado in your crock pot. Cook on low for 8-10 hours or high for 4-6.
  2. 30 minutes before serving, shred the chicken.
  3. Serve over white rice.

Book Review: Fasting as a Family by Melissa Naasko.

Melissa Naasko is a friend of mine, so reading this book was a little like sitting and listening to her talk about food. She moved away a few years ago, so it was nice to read this and “hear” her voice for a bit. She is a wonderful woman and I miss hearing her stories.

That said, this book is geared toward Orthodox Christian households. I am not Orthodox Christian, so I don’t fast quite as hardcore as the intended audience, but I did need some dairy free ideas for Friday fasting aside from pan-fried fish with rice and veggies. This book delivered and then some. Even if you’re not Orthodox Christian this is a helpful book. She includes worksheets and helpful budgeting advice in addition to some pre-made menus.

I’ve made three recipes from this book and I have not been disappointed so far! It’s really helpful to have a book dedicated to meatless meals to turn to when I’m out of ideas (which happens a lot). Whether I need to cut back on meat for budget reasons or fasting, there are some really good ideas in here and I’m excited to try more of the recipes soon.

Would I recommend this? Yes. So much yes. I would happily pay the $21.95 again.

Sew Your Own Pocket Diaper Inserts.

I love cloth diapers. I’m even more fond of pocket diapers. It’s a personal preference, to be sure, but I like pocket diapers better because they have customizable absorbancy and they wick moister more than prefolds. This means that I don’t absolutely have to change the baby every time he or she pees, and you can hack your way to a diaper that lasts for 12 hours with the right inserts for overnight use.

The thing about ordering pocket diapers is that they come with microfiber inserts, or you can pay extra (at least all of the ones I have purchased). For someone who is budget-minded the extra fee is a deal-breaker, but the microfiber inserts aren’t very good.

I have had two heavy wetters. Hamlette is a heavier wetter than Hamling was, so I need something that absorbs a lot of liquid rather quickly. When you put a microfiber insert under the faucet the water beads and rolls off. This means that the diaper is more likely to leak if you use these inserts. Even paired with a hemp insert I was having a lot of trouble with leakage because the hemp absorbs slowly and the pee had nowhere to go but out as the microfiber failed.

To fix this I did some research about fabrics that absorb quickly and, preferably, a large quantity of liquid. I decided that a bamboo/cotton blend would be best, so I purchased a yard or two (I can’t remember) of a bamboo/cotton micro-terry from an online natural fabric store. If you’re not sure what micro-terry is, just think of those baby footie pajamas that are made out of material that’s like a super soft towel. That’s micro-terry.

If I remember right, it was somewhat less economical as I was hoping, but I think I cut the insert cost in half by making my own.

This time around (because I didn’t make enough micro-terry inserts) I didn’t want to buy the fabric and have to strip it and all that jazz. So I raided my ridiculously large stash of prefolds. When I was buying prefolds I didn’t know what to look for (or what I liked) yet, so I got some that were too wide. My mom ordered me a few that were thinner and I ended up primarily using those and using the wider ones as a sort of last resort.

So I cannibalized them.

These inserts do not hold as much liquid as the bamboo ones, but they absorb fast enough that they last through two to three pees. That’s pretty good. As long as I’m not picking up a wet baby I’m happy.

inserts

So, to make these you’ll need a sewing machine, thread, scissors, a marking device, a stencil, and fabric of your choice. If you’re starting with a yard of fabric, you’ll need to decide what thickness you want – I made the bamboo inserts with four layers of fabric – and you’ll need pins to keep everything in place. You’ll also want to wash the fabric a few times in super hot water before you start.

I used an existing insert with a slight modification to the length for my stencil.

Trace your stencil onto the fabric. Sew according to the lines you drew, keeping the edge of the sewing machine foot on the line. Repeat until all of the inserts are sewn, like the picture on the upper right. Trim threads and cut out inserts on the line you drew. Voila!

The bottom picture is a newly cut insert (left) and one that’s been through the wash a couple of times (right). The washed one isn’t exactly pretty, but they’re inside of a pocket diaper, who cares what they look like? The bamboo inserts did not fray at all, so your finished appearance depends on the fabric you chose. Also, you could put more effort into it and actually finish the edges. I didn’t do that because I am teh lazy-sauce.