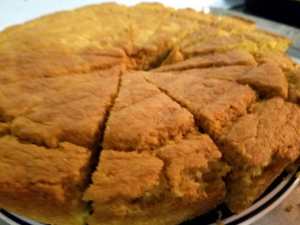
Dairy Free Skillet Cornbread.

20161016_182003I apologize for the quality of this picture: I was in a hurry when I was taking it. So, while I took three separate pictures, none of them turned out very well.

Anyway, it’s getting to be a bit colder here, which is excellent chili weather. The best thing to eat with chili is cornbread (of course) so I make a lot of it. The trouble is that most recipes call for sour cream and milk, so I decided to try using some alternative ingredients.

This is the (super delicious) result. The recipe is a little bit of work, but it’s totally worth it.

Skillet Cornbread

  • Servings: 12
  • Difficulty: intermediate
  • Print
11 1/4 ounces cornmeal (2 1/4 cups)
1 1/2 cups plain coconut milk yogurt
1/2 cup almond milk
1/4 cup avocado oil
1/4 cup coconut oil
1 teaspoon baking powder
1 teaspoon baking soda
3/4 teaspoon teaspoon salt
2 large eggs

  1. Adjust oven racks to lower-middle and middle positions and heat oven to 450°F. Place a 10 inch skillet (preferably cast-iron) on the middle rack and heat for 10 minutes.
  2. Spread cornmeal on a rimmed baking sheet and toast on the bottom rack until fragrant and lightly browned, about 5 minutes.
  3. Transfer toasted cornmeal to a large bowl and whisk in yogurt and milk. Set aside.
  4. When skillet is hot, add the avocado oil and heat for another 5 minutes.
  5. Using potholders, remove the skillet from the oven and add the coconut oil to the hot avocado oil, swirling gently to incorporate. Pour hot oil mixture into the cornmeal mixture and whisk until combined (resist the urge to scrape the extra oil out with a spatula). Whisk in baking powder, baking soda and salt. The batter will immediately start to rise. This is normal.
  6. Whisk in the eggs then pour the batter into the hot skillet and place on the middle rack with a clean cookie sheet underneath to catch any drips that may occur.
  7. Bake for 12-15 minutes, or until the top begins to brown and crack and the sides are golden brown, rotating skillet halfway.
  8. Allow the bread to cool for 5 minutes in the skillet before flipping it out onto a cooling rack.
  9. Cool for 10 minutes and then serve.

Notes

  • This works best with yogurt that’s past it’s date, which basically means it is more sour than fresh yogurt. I usually keep an eye on the dairy discount section of the stores I frequent and make this whenever I pick up a tub of coconut milk yogurt that’s about to “go bad.”
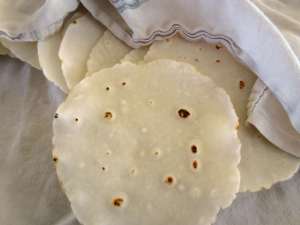
GF Flour Tortillas.

IMG_0853Hubby loves Mexican food. When we were planning our wedding he wanted to have a burrito bar for food. I was worried about getting sauce on my dress, so we opted to do a burrito bar for the rehearsal dinner. My super awesome friend made the burrito bar amazing, and my sister-in-law might have as well. Things are kind of fuzzy that far back. I do remember that they both made the wedding food amazing, but I can’t remember the rehearsal dinner.

Anyway, I make tortillas. A lot. I do corn mostly, because they’re easier and they’re naturally gluten free, but I had wondered for a while if I could make flour tortillas. As with anything gluten free, it has its challenges. Here are some tips for gluten free flour tortilla making:

Use a cast iron skillet (or comal). I was using a T-fal griddle pan for a while, but the cast iron does much, much better.

Do grease the skillet. If you have a seasoned skillet it’s not as important, but it helps a lot. I recommend lard for this. Only use enough to get a thin layer and re-coat every 2 or 3 tortillas. If you’re vegan, palm shortening would be a good substitute.

Use lard. I have used palm shortening before and, while it works, it just isn’t as good. If you’re vegan, palm shortening is a great option. If not, invest in some lard, you won’t regret it.

Warm water. Most flour tortilla recipes call for cold water. While cold water works, it adds more prep time because you have to cut the fat in really well before you add the water. Using warm water melts the fat a little, helping it distribute evenly through the dough which makes the cooked tortilla better.

Medium heat, short cook time. If you want flexible tortillas don’t cook them for longer than 1 minute and 30 seconds. If you overcook them, they’ll break when bent.

Do not skip the xanthan gum. Seriously. Do. Not. I was out once and I thought I’d just sub in some almond flour for the rice flour because almond flour is good for texture in gluten free stuff like pizza crust. Wrong. My tortillas just broke apart. The xanthan gum is for texture and structure, it is not optional.

Use a tortilla press. Press your dough first and then roll it out with a rolling pin. This way you get a more even looking tortilla.

Cover the cooked tortillas. They will dry out quickly otherwise.

Flour Tortillas (GF)

  • Servings: 4 (2 tortillas per person)
  • Difficulty: medium
  • Print
1 cup white rice flour
1/2 cup brown rice flour
Generous 1/2 cup tapioca starch
1 teaspoon xanthan gum
1/2 teaspoon baking powder
1/2 teaspoon salt
2 tablespoons lard
3/4 cup warm water

  1. Combine dry ingredients. Add lard and work into the flour a little. Add in the warm water and stir with a wooden spoon.
  2. Once the dough begins to come together a little start squeezing it together with your hands. Do this until the dough feels like play-doh and mostly holds together. It’s ok if a chunk falls off every now and then, the important part is that it holds it’s shape when squeezed. This should take about 5 minutes.
  3. Cover with plastic wrap and let it rest for 20 minutes.
  4. Preheat the skillet.
  5. Pinch off about 2 tablespoons of dough, roll into a ball and squish in a tortilla press between two pieces of plastic wrap. Move it to the counter and roll it thin while it’s still in the plastic wrap.
  6. Grease the skillet.
  7. Peel the top piece of plastic wrap off and lay it back on the tortilla press for the next tortilla. Flip the rolled dough onto your hand and gently peel the second piece off, draping on the top part of the tortilla press to be used for the next tortilla.
  8. Cook the tortilla for 1 minute, flip and cook for 30 seconds more. Remove and place on a plate, covering it with a towel.
  9. Repeat until finished.
  10. Enjoy.

Cinnamon Raisin Bread (GF).

I’m finally back! We’ve had a very eventful month. I got sick on the week I was intending to post again and then we had a death in the family, so I took that week off as well. It seems like things are finally settling down, so here I am.

While I was away I discovered an awesome IMG_0831recipe for cinnamon raisin bread. And by ‘discovered’ I mean I tweaked an existing recipe to suit my fancy. It turned out really well! I’ve made it twice now and it’s never around for more than 24 hours, so I’m pretty sure it’s a success. I’m actually thinking of making it again this week, if I can summon the energy to go to the store.

Gluten Free Cinnamon Raisin Bread

  • Servings: 12-18
  • Difficulty: medium
  • Print
Filling
1/4 cup sucanat
4 teaspoons ground cinnamon
1 tablespoon potato starch

Dough
2 cups warm almond/coconut milk (110°F)
2 eggs
2 tablespoons coconut oil, melted
14 ounces (3 cups and 2 tablespoons) flour blend
4 ounces (1 1/3 cups) gluten free oat flour
3 tablespoons powdered psyllium husk
2 tablespoons sucanat
2 1/4 teaspoons instant or rapid-rise yeast
2 teaspoons baking powder
1 1/2 teaspoons salt
1 cup raisins

  1. Oil a loaf pan and set aside. Combine warm milk, eggs, and melted oil. Using a stand mixer with a paddle mix all dry ingredients until combined. Slowly pour milk mixture into the flour mixture and mix on low until the dough begins to come together (about 1 minute), scraping the bowl as needed. Increase speed to medium and beat until sticky and uniform (about 6 minutes). Reduce speed to low and add raisins, mixing until incorporated (30-60 seconds).
  2. While the dough is mixing combine the filling ingredients in a mortar and crush them all together. Crush until the sucanat is mostly fine (there will be some large pieces left, that’s okay)
  3. Brush oil onto a sheet of parchment paper. With wet hands, put half of the dough onto the sheet and pat into an 11×8 inch rectangle. Sprinkle half of the filling on top and use the parchment to roll the dough into a log. Pinch the seam together and place in the oiled bread pan, seam side up.
  4. Repeat with second half of dough, placing the seam side down.
  5. Line the bread pan with a foil collar to prevent the dough from spilling over the edge as it rises. You should have about an inch of foil from the top of the pan.
  6. Loosely cover with plastic wrap and let it rise for about 1 hour, or until the dough has risen 50%.
  7. Preheat the oven to 350°F. Remove plastic wrap, spray loaf with water and bake until golden and the loaf sounds hollow when tapped, about 1 1/2 hours, rotating pan halfway.
  8. Transfer to wire rack and allow to cool in the pan for 10 minutes. Remove the loaf from the pan and let it cool for as long as you can resist eating it.